When working with GitHub, you may need to interact with private repositories. For that, GitHub uses OAuth tokens to authenticate and authorize your access to these repositories. By default, these tokens have read-only permissions for public repositories. However, if you need to access private repositories, you must generate a token with read/write permissions. In this blog, we will guide you through the process of generating a GitHub OAuth token with the required permissions for private repositories and how to use it.
What is an OAuth Token?
An OAuth token is a unique authentication credential used to access GitHub’s API. This token is generated by GitHub and is associated with your account. The OAuth token replaces the need for using your username and password when interacting with GitHub repositories programmatically. Tokens allow you to perform various actions, including accessing public repositories, cloning them, pushing changes to them, and even interacting with private repositories, depending on the scope of permissions granted.
Why Do You Need a Token with Read/Write Permissions for Private Repositories?
When you’re working with private repositories, you need to authenticate your identity to gain access. The default OAuth token provides read-only access to public repositories, meaning you can only clone or fetch data. However, to interact with private repositories (such as pushing code, making pull requests, etc.), GitHub requires that your token has the read/write permissions associated with your account.
Step-by-Step Guide to Creating a GitHub OAuth Token with Read/Write Permissions
Follow these steps to generate a GitHub token with read/write permissions for private repositories:
Step 1: Visit the GitHub Token Creation Page
To create a new OAuth token with the required permissions, visit GitHub’s token creation page:
- GitHub Token (Read/Write for Private Repos):
GitHub OAuth Token Generator
Here, you’ll be prompted to log in to your GitHub account if you aren’t already logged in.
Step 2: Configure the Token Permissions
Once you’re logged in, you’ll be taken to a page where you can set the permissions for your token:
- Token Name: Give your token a name or description. This can be something like “Composer on Zebronics” to help you remember where and why you created the token.
- Scopes: Under Scopes, choose
repo, which grants full control over private repositories. This includes:- repo: Full access to private repositories (including pushing and pulling).
- read:org: Read access to organization membership.
- admin:org (optional): Access to manage organizations (if necessary).
Make sure to select the appropriate scopes for your needs. For full access to private repositories, the repo scope is sufficient.
Step 3: Generate the Token
Once you have selected the desired permissions, click Generate token.
Important: GitHub will show you the generated token only once. Copy it and store it securely. If you lose the token, you’ll need to generate a new one.
Step 4: Use the Token with Composer
Once you have your token, you’ll need to configure Composer to use it. Follow these steps to configure Composer to authenticate using the token:
- Manually Add the Token to
auth.json:
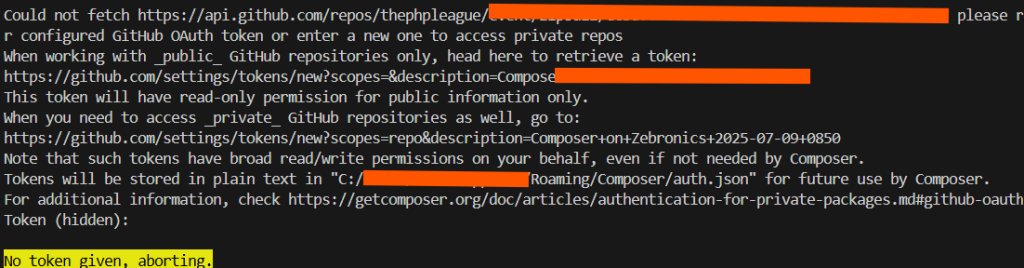
You can manually add the token to your Composer configuration fileauth.json, located at:C:/Users/YourUsername/AppData/Roaming/Composer/auth.json.
Add the following entry in the file:
{
    "github-oauth": {
        "github.com": "YOUR_TOKEN"
    }
}
Replace YOUR_TOKEN with the token you generated.
Use Composer Command:
Alternatively, you can use Composer’s command line to configure the token. Run the following command in your terminal:
composer config --global github-oauth.github.com YOUR_TOKEN
- Replace
YOUR_TOKENwith the token you generated.
Step 5: Test the Configuration
After configuring Composer with your new OAuth token, test your setup by running any Composer command that interacts with a private GitHub repository. If everything is set up correctly, Composer should be able to authenticate successfully and perform the necessary actions.
Best Practices for Handling OAuth Tokens
Here are a few best practices when working with OAuth tokens:
- Secure Your Token: Treat your OAuth token like a password. Do not expose it in public repositories or shared environments.
- Revoke Unused Tokens: If you no longer need the token, be sure to revoke it from GitHub’s token settings page to ensure security.
- Use Environment Variables for Better Security: Instead of storing your token in
auth.json, you can set it as an environment variable for better security. - Limit Token Permissions: Only give your token the permissions it absolutely needs. This minimizes the risk of exposing your private data.