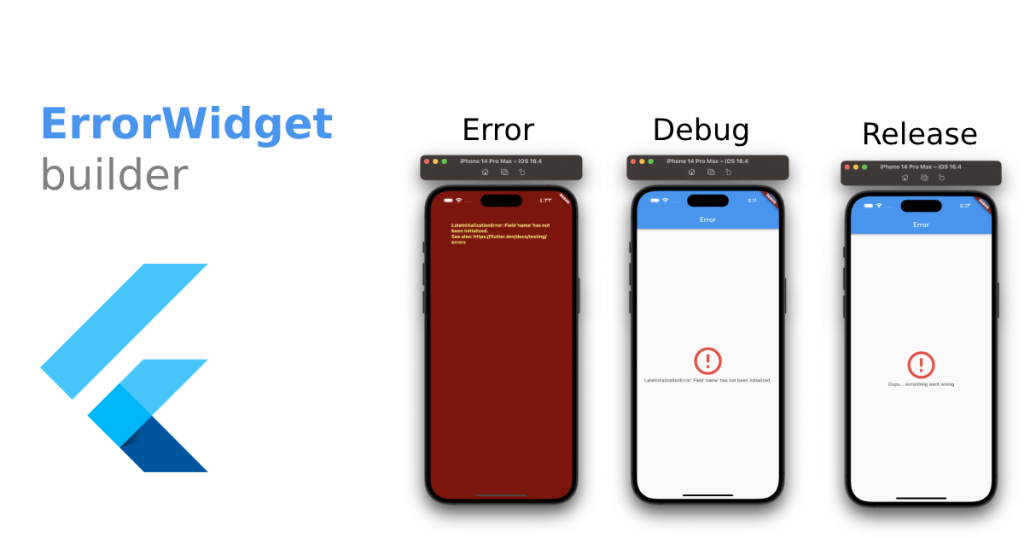
An error widget is an integral component that surfaces when mishaps strike within your application. However, the out-of-the-box error widget offered by Flutter might not always seamlessly align with the unique requirements of your app. As a developer, you may often find yourself in need of creating bespoke error widgets tailored to your app’s design and layout. In this blog post, we will delve into the art of crafting a customized error widget for Flutter, leveraging the Dart programming language.
Step 1: Create Your Unique Widget
The inaugural step towards fashioning a Flutter error widget with your distinct touch is to design a custom widget to be unveiled when errors rear their heads. To accomplish this, let’s create a fresh Dart file and forge a custom class that extends StatelessWidget. Let’s call this class ‘CustomErrorWidget’:
class CustomErrorWidget extends StatelessWidget {
  final String errorMessage;

  CustomErrorWidget({this.errorMessage});

  @override
  Widget build(BuildContext context) {
    return Center(
      child: Column(
        mainAxisAlignment: MainAxisAlignment.center,
        children: [
          Icon(
            Icons.error_outline,
            color: Colors.red,
            size: 50.0,
          ),
          SizedBox(height: 10.0),
          Text(
            'Error Encountered!',
            style: TextStyle(fontSize: 18.0, fontWeight: FontWeight.bold),
          ),
          SizedBox(height: 10.0),
          Text(
            errorMessage,
            textAlign: TextAlign.center,
            style: TextStyle(fontSize: 16.0),
          ),
        ],
      ),
    );
  }
}
In this example, we’ve curated a custom widget that presents an error icon, a heading, and a descriptive message. Additionally, we’ve made room for the error message to be passed as a parameter to the widget, ensuring adaptability.
Step 2: Taming Errors
Moving onward, it’s time to exert control over errors within your application utilizing the ErrorWidget. This widget stands ready to apprehend any unhandled errors that may arise within your app and substitute the default error widget with your custom creation. We can execute this by enveloping our MaterialApp widget within a tailored error handler capable of intercepting unhandled errors and showcasing the custom error widget in their stead.
void main() {
  FlutterError.onError = (FlutterErrorDetails details) {
    FlutterError.dumpErrorToConsole(details);
    runApp(ErrorWidgetClass(details));
  };
  runApp(MyApp());
}

class ErrorWidgetClass extends StatelessWidget {
  final FlutterErrorDetails errorDetails;

  ErrorWidgetClass(this.errorDetails);

  @override
  Widget build(BuildContext context) {
    return CustomErrorWidget(
      errorMessage: errorDetails.exceptionAsString(),
    );
  }
}

class MyApp extends StatelessWidget {
  @override
  Widget build(BuildContext context) {
    return MaterialApp(
      title: 'Custom Error Widget Example',
      home: MyHomePage(),
    );
  }
}

class MyHomePage extends StatelessWidget {
  @override
  Widget build(BuildContext context) {
    return Scaffold(
      appBar: AppBar(
        title: Text('Custom Error Widget Example'),
      ),
      body: Center(
        child: ElevatedButton(
          child: Text('Trigger an Error'),
          onPressed: () {
            throw Exception('An error has occurred!');
          },
        ),
      ),
    );
  }
}
In this revamped example, we’ve meticulously crafted a bespoke error handler that’s adept at capturing unhandled errors and presenting the custom error widget you’ve sculpted. Furthermore, we’ve added a button that, when clicked, triggers an exception, thereby causing your custom error widget to gracefully take center stage.
Step 3: Witness Your Creation in Action
At this juncture, it’s time to set your app in motion and put your custom error widget through its paces. When errors emerge, your customized error widget will gracefully step in, surpassing the default error widget bestowed by Flutter.
In summation, the process of forging a personalized error widget in Flutter using the Dart programming language is a straightforward endeavor. By adhering to these steps, you can engineer an error widget that harmonizes seamlessly with your app’s design, delivering an enhanced user experience when the inevitable errors arise.