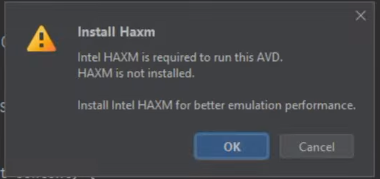
Trying to play emulator but showing install Haxm error. And it open the “Emulator setting” option for installing all latest updates and required files but it showing also this error

Go to the Control Panel: The Control Panel is a centralized location on Windows where you can access various system settings and configurations.
Open “Uninstall a program”: Within the Control Panel, you’ll find different categories or sections. Look for the category named “Programs” and click on the “Uninstall a program” link. This section allows you to manage installed software on your computer.
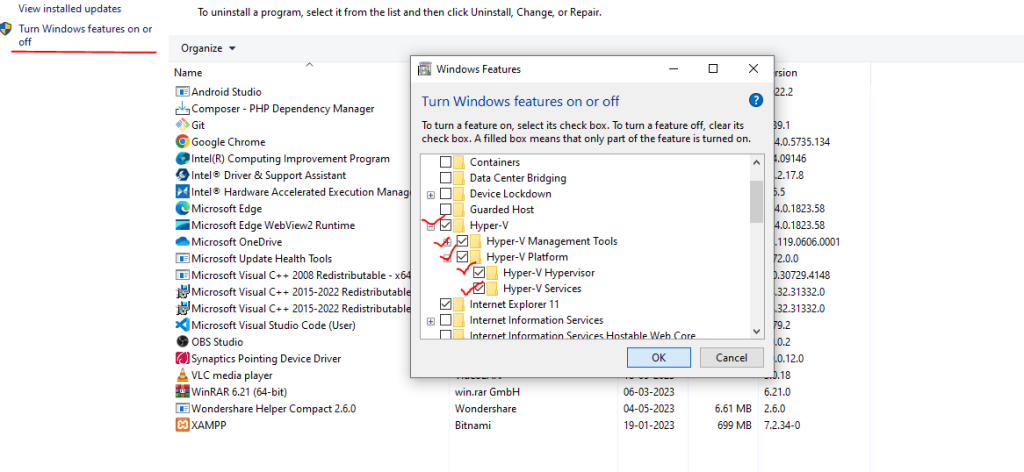
Access “Turn Windows features on or off”: In the “Uninstall or change a program” window, you’ll see a list of installed programs. On the left-hand side, there should be an option called “Turn Windows features on or off.” Click on it to proceed.
Enable Hyper-V: After clicking on “Turn Windows features on or off,” a new window will appear. In this window, you’ll find a list of optional Windows features that can be enabled or disabled. Look for “Hyper-V” in the list and check the box next to it. This action will select the Hyper-V feature for installation.
Select additional Hyper-V options: When you check the “Hyper-V” box, additional options related to Hyper-V will appear below. These options allow you to choose specific components or functionalities within Hyper-V that you want to enable. Select the desired options.
Click on the “OK” button: Once you have checked the “Hyper-V” box and chosen any additional options, click on the “OK” button to initiate the installation process.
If you are unable to check all the options in the “Hyper-v” options, you may need to restart your PC and access the BIOS setup. To do this, restart your computer and enter the BIOS by pressing the appropriate key during the boot process (usually displayed on the screen). Once in the BIOS setup, navigate to the advanced options and select “Device Configuration.” Look for the option called “Virtualization Technology (VTx)” and make sure it is enabled by placing a checkmark next to it. Save the changes and exit the BIOS. Now, when you go back to the “Turn Windows features on or off” section and select “Hyper-V,” you should be able to check all the available options. Ensure that all the checkboxes in the Hyper-V options are selected. With these settings in place, you should be able to start your emulator or virtual machine successfully.